+Table of Contents
User Interaction
The user interface for scrumj looks something like the following:
Headings/labels are in bold, the headings/labels of cells that can't be edited are in italic bold, and the headings/labels that can/should only be changed using the Scrumj menu are in underlined bold
In general, you should not use the “standard” spreadsheet commands to add/delete rows/columns/sheets. Instead, you should use the Scrumj menu. (Menu items that end in ellipses (i.e., …) will prompt you for additional information.) Each tab is protected to help prevent you from making changes to cells that should only be changed from the Scrumj. However, you can, if you think it is necessary, remove the protections using the “standard” spreadsheet commands (i.e., click on Data+Protected sheets and ranges). You can also reset the protections for stories by clicking on Scrumj+Fix protections on current story.
Getting Started
A sprint backlog can be created using the scrumj link (which actually makes a copy of an empty sprint backlog). This document should then be shared with all members of the team (including the product owner).
When a sprint backlog is initially copied it contains just an Overview page and an Assignments page. The first things a user should do after copying a sprint is to re-name it (in the usual way), set the start/end dates (by clicking on Scrumj+Set dates…), and add all of the team members to the Assignments page by entering their names in the cells to the right of the header/label. (Notes: 1. The start date should be the date the sprint actually starts, not the date of the planning meeting. 2. You cannot add team members after you have added a story, so add all of them now.)
Note that the first time you use the scrumj menu you may be asked to give a script attached to the document permission to run. You must give the script (which is named scrumj.gs) permission to do so.
A story can be added to a sprint by clicking on Scrumj+Add one story or Scrumj+Add multiple stories. As with most names, it is better to avoid the use of spaces (which are normally used as delimiters) and special characters in story names.
The tabs for the stories are color-coded as follows.
| Color | Meaning |
|---|---|
| Green | All tasks completed and all acceptance criteria confirmed |
| Yellow | All tasks completed but some acceptance criteria unconfirmed |
| Orange | Some tasks incomplete but, somehow, all acceptance criteria confirmed |
| Red | Some tasks incomplete |
| Black | Story was deactivated during sprint planning meeting |
The name of the active tab is rendered in green.
The Overview Page
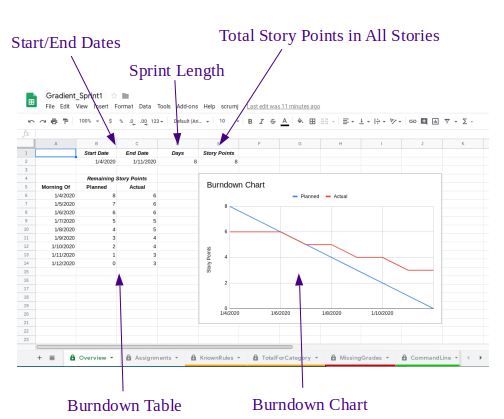
The Overview page provides an overview of the sprint and the progress that has been made thus far. It looks something like the following:
In general, one should only need to set the start and end dates at the start of the sprint. After that, everything else on the page should be updated automatically. In the event that this page gets “out of date” for some reason, click on Scrumj+Update Overview.
The start/end dates can be set from the menu by clicking on Scrumj+Set dates…. The sprint length is calculated from the start and end dates.
The total number of story points is calculated (automatically) by adding the story points for all of the stories. This information is then used to create the planned values in the burndown table/chart.
The actual values in the burndown table/chart are calculated using the confirmation dates of the individual stories.
The Assignments Page
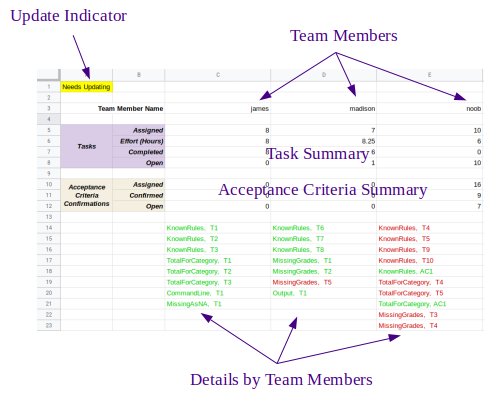
The Assignments page provides a summary of the various work items that each team member has volunteered for. (The term “assignment” is a bit of a misnomer, given the way the Scrum process works.) It is also where the names of the team members are entered. It looks something like the following:
The task summary and acceptance criteria summary contain statistics about all of the stories in the sprint (except those that have been deactivated). It is presented for each team member individually.
Underneath the summaries are lists (for each team member) of all of the tasks (T) and acceptance criteria (AC). The color indicates the current status.
Note that the Assignments page does not update itself automatically, because it is a fairly lengthy process. Hence, if you want to have current information, you must click on Srumj+Update Assignments. When the page is known to be out of date, the update indicator will be displayed in the upper-left corner.
Story Pages
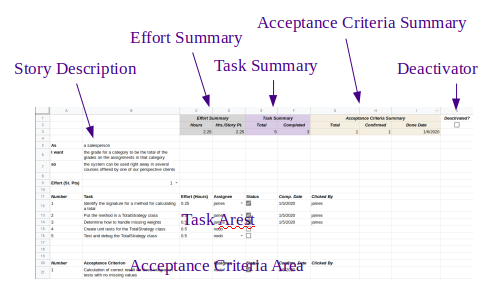
A story page looks something like the following:
The story description can be entered “in as-I want-so” format by typing in the corresponding cells.
Tasks can be added to the task area by clicking on Scrumj+Add one task or Scrumj+Add multiple tasks…. Similarly, acceptance criteria can be add to the acceptance criteria area by clicking on Scrumj+Add one acceptance criterion or Scrumj+Add multiple acceptance criteria….
A task or acceptance criteria will always be added at the end of the respective area and will be numbered accordingly. The user must enter the description and assignee (and effort for tasks). When a task is completed or an acceptance criteria is confirmed, the user should click on the corresponding status checkbox. The date will be entered automatically and, if permissions have been granted, the name of the person who clicked the status box will also be entered.
The information in the effort summary, task summary, and acceptance criteria summary is calculated from the information in the task area and acceptance criteria area.
User Interaction
A task can be removed by clicking on Scrumj+Delete one task…. Similarly, an acceptance criterion can be removed by clicking on Scrumj+Delete one acceptance criterion….
The deactivator can be used to exclude a story from the sprint. This is convenient when the team determines that a story won't be completed after all of the tasks (and, perhaps, acceptance criteria) have been entered, but before the sprint begins. Accordingly, a story can only be activated during the sprint planning meeting. Deactivating a story will allow it to be included in a subsequent sprint.
The current story can be deleted by clicking on Scrumj+Delete current story.
Known Issues
Because of a defect in Google Sheets, you will sometimes get an error message when you try to make a change to a story. This is because each sheet is protected (to prevent you from editing cells that you shouldn't), and the defect causes the protected ranges to be changed when they shouldn't be. The problems this causes can usually be corrected by clicking on Scrumj+Fix protections on current stories. If this doesn't work, you can remove all protections (but you must then be careful not to change cells that you shouldn't change).


