Table of Contents
Autolab Common Tasks
This page provides information about various common tasks.
Accessing Autolab
Autolab can be loaded into any modern WWW browser from the following URL:
It is only available to members of the JMU community. So, if you are off-campus, you will first need to sign into the JMU Virtual Private Network (VPN) .
Disable non-JMU VPN
If you are using any non-JMU VPN, FANTASTIC! 🙌 The only thing is you must disable this to use autolab.
Logging In
The login screen looks something like the following.
Note that you must use your dukes.jmu.edu email address and your
Autolab (not your JMU) password.
For your first sign-in, you will not know your password and should use the “Forgot your password?” mechanism (don't worry, we know you didn't forget it 😉).
Handling Login Problems
If you've forgotten your Autolab password (which is different from your normal JMU password, because Autolab does not use JMU's authentication system) or never used Autolab at JMU before, you can reset/set your password by clicking on the “Forgot your password?” link at the bottom of the login page.
If you can login to Autolab but the course you are looking for is not listed, it probably means that you added the course after your professor uploaded the roster. So, you will need to contact your professor.
If Autolab doesn't recognize your email address, you should contact your professor. They may then register your or ask you to register yourself by clicking on the “Register” link at the bottom of the login page. If you register yourself, remember that you must use your dukes.jmu.edu email address.
Courses
The courses page looks something like the following:
Your current courses are listed at the top of the page, and your completed courses (if any) are listed at the bottom of the page. For each course, the system shows its name, the semester, and the assignments. Clicking on an individual course will provide you with information about the assignments in that course.
Assignments in a Course
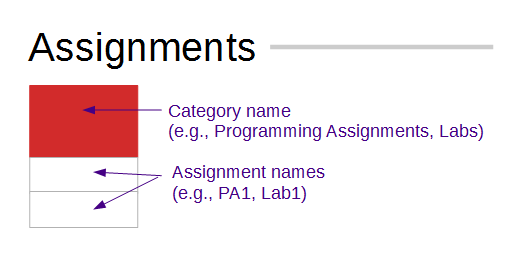
If you “drill down” into a course you will see an assignments page that looks something like the following.
Clicking on an individual assignment will enable you to submit your code and view your submissions.
Individual Assignments
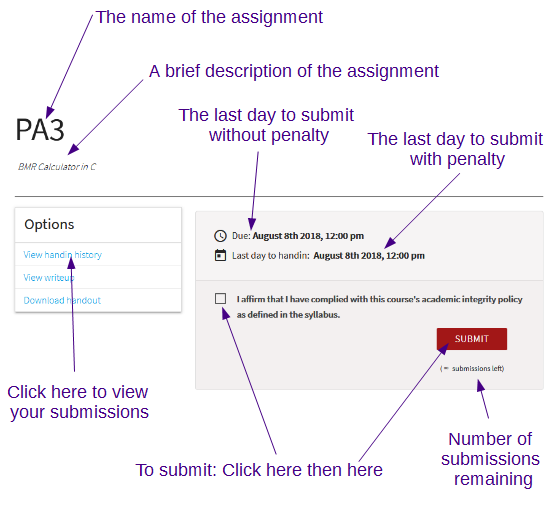
The page for an assignment looks something like the following.
You can submit your code by (1) affirming that you have complied with the JMU honor code and all course-specific policies, and (2) clicking on “SUBMIT” (which will then prompt you to select the file to submit). The kind of file you must submit will vary from assignment to assignment. If you must submit a .zip file, make sure you understand how it must be structured and then see the help page on creating %%.zip%% files.
You can also see information about due dates/times, the number of times you can still submit (which may be infinite depending on the course/assignment), and your submission history.
In some courses, you will also be able to click on “View writeup” to see the details of the assignment and/or on “Download the handout” to get any code/data that were provided for the assignment. In other courses you will have to get this information from the course WWW site or from Canvas.
Submission Results
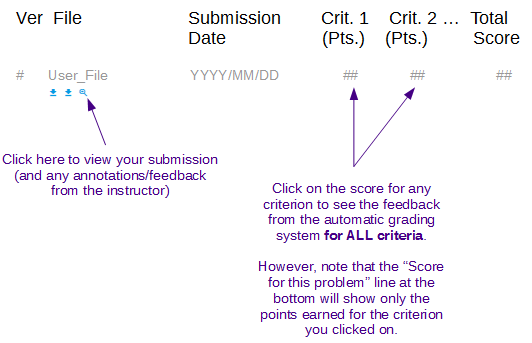
After you submit your code, you will be presented with a page that looks something like the following.
If the points for your current submission are shown as dashes then you will need to reload the page after waiting a few seconds (perhaps more than once).
Once the submission has been graded (i.e., when the points are listed as numbers), you can click on any of them to get the feedback from the automatic grading system. Note that, though there are different links, each one provides feedback on all of the criteria. The only thing that varies from link-to-link is the “Score for this problem” at the bottom, which shows the points awarded only for that criterion. See the description of the grade report for more information.
After the assignment has been completely graded, you may also receive feedback from the instructor (e.g., on the quality of your code). This will be displayed in the “Remarks” section of the last submission.
Individual Submissions
If you click on the magnifying glass for a submission, you will be presented with a page that contains a list of the files you submitted. If you click on the magnifying glass for a particular file you will be presented with the source code that you submitted.
Remarks (i.e., Instructor Feedback) on Individual Submissions
If the instructor provides them, you can view their remarks in the same way that you can view the feedback from the automatic grading system. Specifically, click on any of the “score links” for the submission you are interested in (typically the last one). Below the feedback provided by the automatic grading system will be a section labeled “Remarks” that will include the feedback, the name of the file it relates to, and the relevant line number in that file.
If you click on the magnifying glass for a submission, you will be presented with a page that contains a list of the files you submitted. If you click on the magnifying glass for a particular file you will be presented with the source code that you submitted.


